Chocolate Brownie Cake Pops
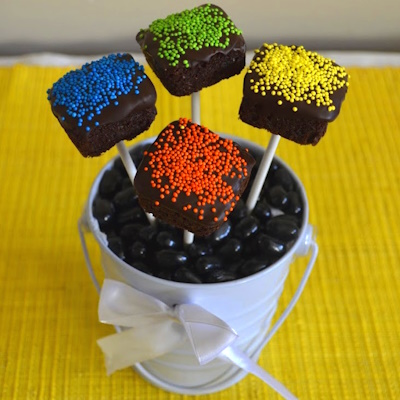
Chocolate Brownie Cake Pops are so easy to make and are perfect for favors or party treats. Make them into these cute brownie pops and make them into favors or a cute party treat. Simply dip the mini brownies into chocolate and decorate with sprinkles of your choice to match the theme of your birthday party. Dip in white or dark Chocolate and add Colorful Sprinkles! Let harden in a large piece of Styrofoam or use a cake pop stand. Add cute tags or flags for decoration. We used a circle punch and some colorful scrapbook paper. You could add a small photo in the center as well. Cupcake toppers with a hole punch are also perfect tags.
We will feature two ways to make your brownie pops. The first uses a Wilton Silicone Brownie Mold and the second just form your own pops with a small scoop. If you are one of those that love the edges and corners, the silicon mold makes every piece a corner.
- Brownie Box Mix like Duncan Hines, Betty Crocker, Ghirardelli or Your favorite recipe
- Chocolate (semi-sweet, dark or white)
- Lollipop Sticks
- Sprinkles
Other Items
- Wilton Silicone Brownie-Squares Baking Mold. Note that it will take two batches to use all of brownie mix so two molds are ideal if you want to bake it all at once.
- Baking Spray
- Treat bags (if you want to package them individually) There are lots of cute options for colored or patterned lollipop sticks, clear bags and colored twist ties on Amazon like these.
- Ribbon is another option to secure your treat bags.
- Tag or small flag to attach to stick if you are displaying or giving as party favors.
Directions
- Make brownies as suggested on box or your favorite recipe.
- Spray with baking spray with flour. This worked well for easy removal and none of the brownies broke.
- Fill each cavity halfway with brownie mix. See tip below for easiest way we found to fill each cavity.
- Bake for 18 minutes. There is no time given on the mold itself and it was a little faster than the time on the box. We found 18 minutes was perfect. Note
your oven may need some adjustment to time.
- Let cool completely before gently popping out of the mold by pressing the bottom of each one. If you do it sooner it is likely the brownies will break. This is why having two of these Wilton pans are ideal.
- Melt white or regular chocolate. Use Wilton Chocolate Melter or we like stainless steel bowls on the stove. See below for our favorite option. Since microwaves vary, times will vary. Heat until just melted.
Chocolate should be warm not hot. Chocolate scorches very easily and will taste burnt if heated too long. Microwave 60 seconds on 50% power, stir well, and repeat 30 seconds at 50% power until melted.
- Insert lollipop sticks into each brownie almost half way.
- Dip into chocolate a little more than half way.
- Tap stick gently while slowly rotating the stick to remove excess chocolate
- Add sprinkles and candy decorations. Stick into Styrofoam to dry. Placing in the refrigerator right away helps any drips from forming and hardening quicker.
Tips
- We used 4" sticks for our brownie pops. You can find them at Walmart, Amazon and Michaels or any craft store with kitchen items and Wilton products.
- We like the Wilton brand mold. It holds up well after repeated use. If it isn't available on Amazon, you can find them at stores like Michaels. Whichever one you select, be sure it is food grade silicone.
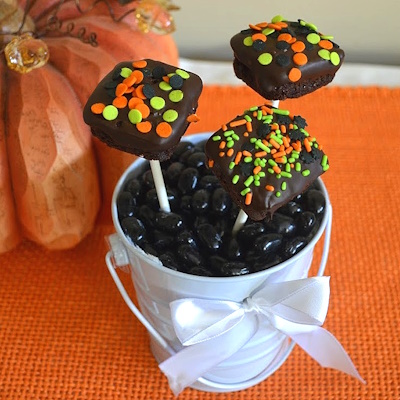
Holiday Chocolate Brownie Cake Pops
It's easy to change the sprinkles to coordinate with your Holiday or Party theme. You could even use white chocolate and color it with food dye and do a second color and drizzle it over the brownies for specific colors. We like to collect a variety of sprinkles for all holidays.
There are many fun sprinkles for Easter, Halloween, Valentines and Christmas.
Bag them individually or have it ready to take and eat in a festive container. Place styrofoam in the base and add some colorful candies to match. The candies will also help weight down the container.
Tips
Bag them individually or have it ready to take and eat in a festive container. Place styrofoam in the base and add some colorful candies to match. The candies will
also help weight down the container.
Tips and Suggestions
- We found the easiest way to fill each cavity neatly was to use a frosting bag or a freezer quart ziplock. Place it over a glass cup like you would a frosting bag and fill 3/4 of the way trying to squeeze it into one corner. Make a small snip (start small and increase size if needed). Squeeze mix into each cavity and using the tip gently press
mix into all corners of the mold.
- Cool the brownies completely while in the mold and then press brownie out of mold gently from the bottom. If it cracks a bit, gently press brownie back into shape. We did not have any break in half
- Do not get any water in your melted chocolate, this will ruin it.
- If you have a Walmart near you, they will probably have the best prices for lollipop sticks and treat bags. Look for it in the party section.
- You can find styrofoam blocks at Wal Mart and craft stores. You can use one you have from packing as long as it's clean and will not tip over after sticking
in the pops. We used a flat rectangle about 14 x 12 inches.
- Find a cup, container, tin or basket with a picture of your theme on it to serve these treats. Just find some styrofoam to fit your container and stick
the pops in it.
- Add labels for birthday parties or special occasions. Make a flag or cut out circles in cardstock, punch a hole and use markers to decorate or stickers. String a thin ribbon through the hole punch and tie to the lollipop stick.
- Place inside an airtight container. I would separate the layers with waxed paper. They can be refrigerated up to a week. Let come to room temperature to serve.
Cake Pops
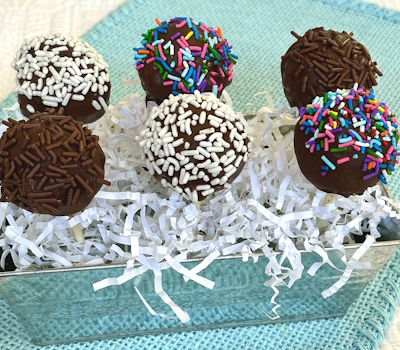
Chocolate Brownie Cake Pop without a Mold
These are probably the easiest way to make a chocolate brownie cake pop as well as the most traditional shape. It does not require a mold but we did have to weigh each pop so that they would be the same size for best visual results.
Ingredients
- Brownie Mix
- Hershey's Milk Chocolate Chips
- Sprinkles
Other Materials
- Lollipop Sticks
- Foil Lined Pan
Steps
- Bake brownie as instructed on the box in a foil lined pan. Cook it at the least amount of time recommended. Test doneness with a toothpick.
- Let cool completely
- Lift our brownies and cut the outer edges.
- Crumble the rest of the brownie into a bowl.
- Form 1 1/2" balls using a spoon or scoop. We weighed them so they would be all even sized when rolled. We weighed them at 1 ounce each. It will make about 15 balls.
- Refrigerate until firm, about 2 hours. Insert a lollipop stick into each brownie ball. Refrigerating is to keep the brownie balls from falling apart when dipping.
- Set up your sprinkles in small bowls
- Melt chocolate chips in the top of a double boiler over simmering water, stirring frequently and scraping down the sides with a rubber spatula to avoid scorching. Chocolate scorches easily. Keep warm.
- Dip your brownie balls in the chocolate and let the excess drip off. Add your sprinkles by spooning the sprinkles on your brownie ball. Dipping them in the bowl will get messy with excess chocolate and it will not be easy for the next dipping
- Place your chocolate brownie pop on parchment to dry or if you have a piece of styrofoam, place it in one of the holes and let dry. I couldn't find my styrofoam, so I took a cardboard tray, turned it over and poked holes in it to fit the lollipop sticks tightly.
Tips
- We found 1 ounce was a good weight for the round Chocolate Brownie Cake Pops. If you make the cake balls any heavier they had a greater chance of cracking and falling off the lollipop stick. It also looked too big for the lollipop stick. Dunking in the chocolate was more challenging as well.
