Making Bookmarks
Description
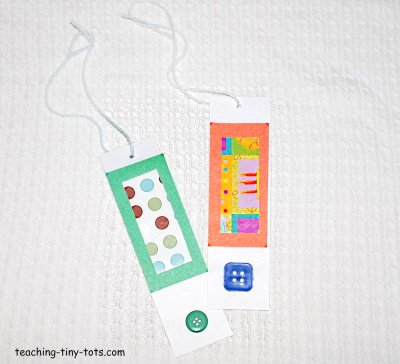
Using a few simple materials your child can make a fun bookmark and encourage reading.
Materials
- Cut cardstock into 8" x 2 1/4" for your base.
- Cut a colored construction or cardstock paper into 4 1/2" x 2 1/4" pieces.
- Cut wrapping paper, or patterned scrapbook paper into 3 1/2" x 1 1/2" pieces
- Colored button, foam piece, sticker, sequin or other embellishment
- Hole Punch (shaped punches add a little design to the bookmark.
- Non toxic Elmer's Glue
- Yarn or ribbon
- Clear contact paper to laminate bookmark and make it last longer. (optional)
Steps
- Select colors to be used.
- Have child lay out pieces from large to small.
- Glue paper pieces together.
- Glue embellishment (button, sticker, etc.
- Punch hole and tie ribbon or yarn through hole.
Tips and Suggestions
- Gluesticks can be used for the paper and are generally easier for younger children to handle.
- Putting glue on both surfaces to be stuck together makes a stronger bond.
- Having a sample available makes it easier for child to visualize end product.
- Having embellishments like buttons may need a stronger glue like Aleene's
Other Ideas
- Use other types of materials like felt or material scraps. You may need Fabri Tac for this to adhere properly. Fabri tac is an excellent bond but will require adult supervision.
- Great activity for small groups of children.
- Have picture of child to put on instead of button.
Educational Tips
- Ask your child which color he/she wants to use.
- See if your child can tell you what shapes they are working with.
- There are lots of opportunities for discussion even in a simple toddler activity such as this. Discuss the sizes of the rectangles. Use different vocabulary to describe the shapes. "Which is the largest rectangle? Which rectangle is the smallest? What color is the biggest rectangle?"
