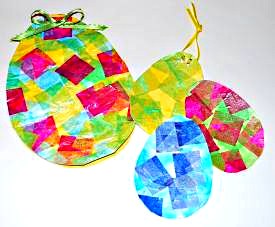
Colorful Easter Card and Tags
Description
In this day and age, more and more cards are sent via email. They are fun however, it is always extra special to receive something in the mail. Here is a handmade Easter card that your child can make. You can make small ones into gift tags or even frame them in a collage or hang like a mobile to make a colorful Easter decoration.
Materials
- Colored Tissue in about 4 colors
- Two sheets of white construction paper 8.5 x 11
- Elmers Glue
- Small container
- Brush
- Pencil
- Ribbon
- Small piece of Mailing tape (Scotch)
- Printable Easter Egg Pattern for Card and Tags
- Cookie Tray or Plastic Tray to put squares of tissue on.
- Scissors
- Water
- Acrylic Sealant Spray (Adult only: Optional but gives project a nice sheen)
Steps
- Draw an egg shape onto white construction paper or print out pattern and xerox onto white construction paper.
- Cut tissue into 1" squares. Spread out so colors are visible and pieces are not overlapping much onto cookie sheet or plastic tray.
- Pour about 1 teaspoon Elmers glue into dish and add about two teaspoons of water. Mix well with brush.
- Using tip of brush with glue mixture on it, lightly touch one of the squares of tissue.
- Square should stick to brush. Place on paper, and brush so piece is covered with glue mixture.
- Repeat until entire area is covered. Let dry.
- Spray with adhesive spray lightly if you want your egg to have a little shine.
- When dry. Place the second sheet of white construction under the first with the tissue egg, and cut out the shape.
- Write message on the second sheet of paper.
- To reinforce holes place a small piece of Scotch mailing tape on the back prior to punching hole.
- Punch two holes at the top or side of egg.
- String ribbon through the holes and tie.
- For the Easter Tags, cut out, punch two holes and string a piece of thin ribbon or raffia through and tie onto gift.
Tips and Suggestions
- Note: The pattern is very light so as to minimize the visibility of the lines after being cut. The line should still be visible after applying the tissue since it is very sheer. We tested it with a dark blue tissue.
- This is a perfect young toddler activity because even if they go out of the lines, it will be cut off or if tissue folds, just let it dry that way, it will create interesting shades.
- Reinforce the punched holes by placing a piece of clear mailing tape on the back prior to punching hole.
Another Way To Cut Out the Card
- Fold Construction paper in half. Draw the egg with one side of the egg partially on the fold. Make sure about 2-3 inches of the side of the egg
is on the fold so after cutting the card will not tear
easily. Glue on the tissue, let dry and cut out egg leaving the side where the fold is, intact. The card should open like a book now.
Open and write message inside.
- Use glitter glue to add some shine to this toddler activity if you do not have acrylic spray.
Easter Cards Were Sent over 100 years ago
As long ago as 1820, young people wrote letters to their friends at Easter time. You can find quite a few early 1900's postcards and cards available from
collectors and other sellers. Many that I have seen have muted colors, flowers and animals or a cross in the picture.
